 Anybody
Live demo
Anybody
Live demo
Anybody
Live demo
Anybody
Live demo
Build guide · Stage 1 · Bluetooth
A face on a tiny screen, a head that turns, an arm that waves, a light, and a touch pad. Your phone or laptop is its ears, its voice, and its link to the brain over Bluetooth. The shell is yours to design.
How Stage 1 works
The body has no microphone or speaker yet, so it stays cheap and simple. It talks to your phone or laptop over Bluetooth, and the phone talks to the brain over the internet.
The robot
Screen face, head servo, arm servo, light, touch pad. Runs only the moves in its body file.
Your phone or laptop
Microphone, voice, and Web Bluetooth. Starts listening when you touch the robot.
The cloud
Decides, replies, and calls tools: web search and shop search. Streams back words and moves.
touch over Bluetooth.[face:happy] and [do:wave].face happy, do wave, led 30 90 255 to the robot.Voice from the robot
Pair a small Bluetooth speaker with your phone and hide it inside the shell. The voice then comes from the robot itself.
Next: Stage 1b
The same body with a microphone, a speaker, and Wi-Fi on the board, so it works without a phone. The brain and the body file stay the same.
Step 1 · Parts
Each part shows a listing we checked and the exact type to look for. Press Live prices to check Google Shopping for Hong Kong again. Many listings are overseas shops that ship to Hong Kong, so shipping is extra. One Taobao or AliExpress order is usually cheapest, and electronics shops in Sham Shui Po usually stock servos, breadboards, wires, and capacitors.
Parts total
HK$220.46
Sum of the listings above, with two servos and both wire packs, before shipping. Prices as listed on 6 October 2026.
You also need
Nice to have
Step 2 · Wiring
The breadboard carries two kinds of power. 5V runs the servos and the light. 3V3 runs the screen and the touch pad. Every part also needs GND.
Signal wires go straight to the board's left pins. Power wires go to the rails at the bottom.
5V to the red + rail on one side and GND to the blue − rail next to it. XIAO 3V3 to the + rail on the other side. One short wire joins the two − rails.D0 for the head and D1 for the arm. Use male-to-male wires in the servo plugs.DIN to D2, 5V to 5V, GND to GND. Use the in side of the board, not out.I/O to D3, VCC to 3V3, GND to GND.SDA to D4, SCL to D5, VCC to 3V3, GND to GND. Read the labels on your screen: some put GND first, some VCC first.Nothing from the 5V rail may touch a 3V3 pin or a D pin. Check the capacitor's stripe: backwards, it can burst. The screen must be the 4-pin I2C type.
Step 3 · Firmware
No Arduino setup. Chrome or Edge on a computer writes the Anybody Body firmware over USB.
Anybody-1A2B. That is your robot waiting for Bluetooth. If the screen stays dark, press the R (reset) button once.No port in the list? Unplug, hold the B (BOOT) button, plug in, let go, and try again. Close any Arduino Serial Monitor: it keeps the port busy.
Prefer Arduino IDE
v1.0.0 · Arduino core 3.3.12 · ESP32-S3 · BLE GATT · U8g2
Serial Monitor at 115200
The same commands work by typing: face happy, do wave, led 0 120 255, stop. Handy for testing without Bluetooth.
Step 4 · Test the body
Power the robot, connect here over Bluetooth, and press the buttons. Each check turns green when the robot answers.
Connect to read it.
Touch the pad after connecting. You should see touch.
Step 5 · Talk to it
Anybody-…. It waves when it joins.Things to try
Step 6 · Your shell
Cardboard, a 3D print, a plush toy, LEGO, a paper cup. Anything works if it follows five rules. Make it look like a cat, a rocket, a dumpling, or your teacher's favourite mug.
The picture on the screen is about 22 × 11 mm. Cut a 25 × 14 mm window and tape the screen behind it.
The head turns about 50° each way. Leave room around it and 5 cm of slack on the four screen wires.
Glue a light arm to the servo horn. It swings through about 120°, from down at the side to up high.
The touch pad works through thin card or plastic. No metal or foil in front of it.
Put the light behind something thin or white, and keep the USB-C port reachable.
Sizes to design around
Start from our head box
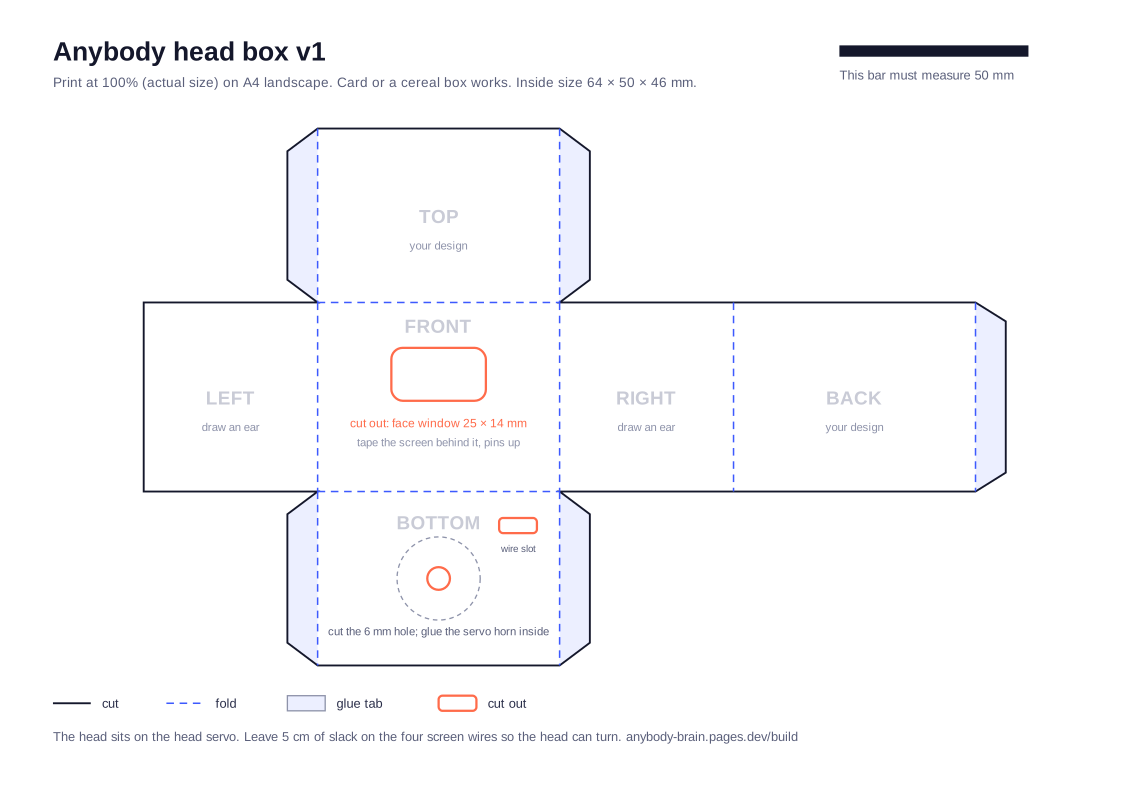
Print at actual size on A4, cut, fold, glue. Then draw on it, cover it, or throw it away and design your own.
Download the A4 templateCardboard
A cereal box and the template. One evening, no tools beyond scissors and glue.
3D print
PLA with 2 mm walls. Design around the sizes above and leave a door for the USB cable.
Plush
Open a seam, put the head servo in the neck, cut a face window, and stitch around the screen.
LEGO
Glue a servo horn under a 2 × 2 plate and build the head on top of it.
Small parts: not for children under 3. A grown-up builds it with younger children. Round off sharp edges. Keep the power bank where air can reach it, and never use a swollen or damaged battery. Avoid metal tins: they block Bluetooth and the touch pad.
Show us
Post your robot with #AnybodyShell, or email a photo to s1463556@live.hkmu.edu.hk. Later Anybody Studio: describe the robot you want and get a printable shell and its body file.
For makers
The brain learns what a body can do from its body file. Add a move to the firmware and to the body file, flash it, and the brain can use the new move the next time the robot connects. No change to the brain.
Commands and events
face neutral|happy|sad|surprised|sleepy|love|thinkdo shake|look_left|look_right|wave|dancestate idle|listen|think|talk · led r g b · led off · stoptouch · touch_long · ok … · err … · done …// the body file this robot sends { "v": 1, "name": "desk-bot", "kind": "doll", "faces": ["neutral", "happy", "sad", ...], "actions": [ { "id": "wave", "say": "wave the arm for hello or bye" }, { "id": "nod", "say": "nod for yes" } // your new move ], "light": true, "inputs": ["touch"], "limits": { "servo_deg": [20, 160] } } // in the sketch: the keyframes for the new move static const Key NOD[] = {{0, 70, 220}, {0, 110, 220}, {0, 90, 300}}; ACTION("nod", NOD),
The say text is what the brain reads to decide when to use the move. Keep each move short; the robot stops moving on its own if the link drops.
Help
Check that it is the 4-pin I2C type and that VCC goes to 3V3 and GND to GND, using the labels printed on your screen. Then swap SDA and SCL. The Serial Monitor at 115200 prints "OLED found" or "OLED not found" at start-up.
The servos pull more current than some laptop ports give. Power the robot from a power bank or a 2 A charger, check the 470 µF capacitor across the 5V rails, and keep the servo wires short.
Some lights need a stronger data signal at 5V. Move the light's power wire from the 5V rail to the 3V3 rail. It gets a little dimmer, and this usually fixes it.
Use Chrome or Edge, turn Bluetooth on, and make sure the screen shows the robot's name. Only one device can connect at a time, so close the tester or the demo in other tabs. iPhones and Safari cannot use Web Bluetooth.
I/O goes to D3, VCC to 3V3. Leave the A and B jumpers on the touch board open: the default sends a high signal while you touch it. Press the mic once in the demo first so the page can use the microphone.
Use a cable that carries data, not a charge-only cable. Hold the B button while you plug in, close other programs that use the port, and try again.
That is how Stage 1 works. Pair a small Bluetooth speaker with the phone and put it inside the shell. Stage 1b puts a speaker on the board.
Stage 1 pass test
The last check is the Stage 1 test on the Anybody roadmap. Ticks stay in this browser.